RSS

Blog

Fitting An Endless Pools Fastlane To Your Swimming Pool

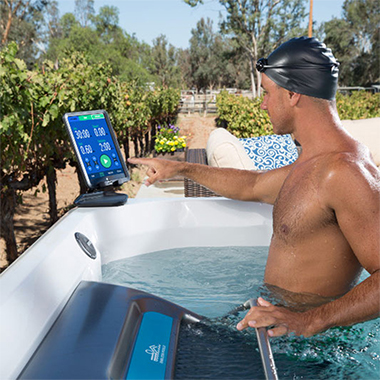
So what exactly is the Endless Pools Fastlane?

Endless Pools Fastlane counter current swim system
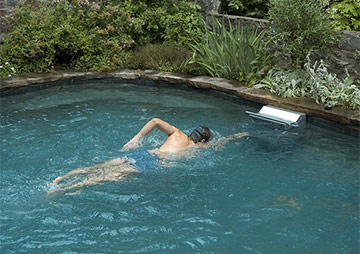
The Fastlane is a powerful, counter current system that delivers a smooth, even swim current to your swimming pool. It has a fully adjustable swim pace from zero to a 1 minute 10 second hundred yard pace (1 minute 16 second/100 meters) and allows you to swim in place without the need to turn. It’s perfect for converting any small pool into a home fitness system.

How does the Fastlane work?

The Fastlane consists of two parts, a hydraulic power unit and a swim unit. The 5Hp power unit is usually located remotely with other pool equipment and provides power to the swim unit via two hydraulic hoses, utilising biodegradable vegetable based hydraulic fluid. The swim unit mounts pool side. Inside the swim unit is a special, sealed stainless steel hydraulic motor that turns a custom designed 16” (40cm) propeller. Water entering the base of the unit travels through a unique channelling system that helps straighten the swim current and removes any turbulence from the water before being delivered through the final smoothing grill at the front of the unit.How to position your Endless Pools Fastlane system

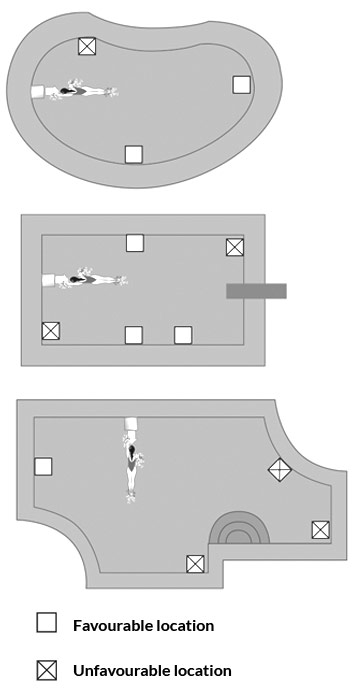
How do I use the Fastlane?

Using a Fastlane is incredibly straightforward. Simply position yourself in front of the swim unit so that you can swim into the current and then turn the unit on by pressing the on/off switch button on the remote control fob. Once you are comfortable with the swimming position you can increase or decrease the speed by using the faster and slower buttons on the control fob. Remember, because you are swimming without stopping you will tire 20-30% faster than when swimming laps. To stop swimming simply press the on/off button. If you turn the unit back on, the Fastlane current will return to the last speed programmed into the remote. The Fastlane has a built-in safety timer that will automatically shut off the current after 30 minutes.

Where do I position the Fastlane in my pool?

The Fastlane can be installed in virtually any new or existing in-ground concrete, gunite, masonry, vinyl lined or fibreglass pool together with any above ground pool. Water depth can be as shallow as 35”, generally speaking, if a pool is deep enough to swim in, it’s deep enough for a Fastlane!

There are two different types of fitting systems for a Fastlane, either a deck mount or a wall mount bracket. The deck mount option is suitable for retro fitting a swim unit to an existing pool and a wall mount bracket is used for new pool builds as it is incorporated into the wall structure itself.

The swim unit must be installed no closer than 24” (61cm) from any adjacent pool wall and choosing a location that is at least 12’ (3m 65cm) from an opposing wall (see diagram opposite) will provide you with the ideal swim lane for exercising. Remember, to help ensure a turbulent free swim current it is also key to position the swim unit away from surrounding walls, benches and stairs.

Installing a wall mount Fastlane to your new pool build

The wall mount Fastlane attaches to your pool wall with the use of a special, wall mount bracket that is embedded in the pool wall. The hydraulic hoses and power unit are then hidden in the pool wall under the pool deck area leaving a clean looking installation on your pool. If you are building a new pool or significantly refurbishing an existing pool this option of mounting the Fastlane unit is ideal for you.

The minimum clearance guidelines for this type of installation are outlined below.

Wall Mount Fastlane ClearanceFastlane Clearance

Installing a deck mount Fastlane to your existing pool

The deck mount Fastlane can be installed on any existing pool without the need to alter the wall structure. A deck mount hose cover conceals the hydraulic hoses and is secured to the deck area around your pool and you can either run the hoses along the pool deck area itself or through a trench. If you are winterising your pool the deck mount Fastlane allows you to easily remove the unit and store it over winter. The hydraulic fluid that remains in the hoses will not freeze, even in cold climates.

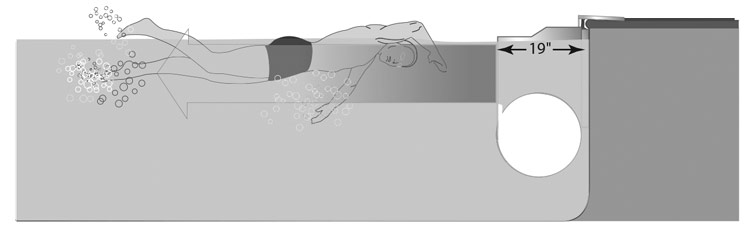
If you choose the deck mount Fastlane option there must be 18” (46cm) of solid decking from the pool water’s edge to the mounting site because the swim unit will need to be bolted to the pool deck. If your pool decking isn’t wide enough a small concrete pad will need to be poured to help secure the mounting bracket. Once installed the deck mount Fastlane unit extends 19” (48cm) into your pool and 18” (46cm) onto the pool deck area.

Installing A Deck Mount Fastlane

Planning the equipment placement

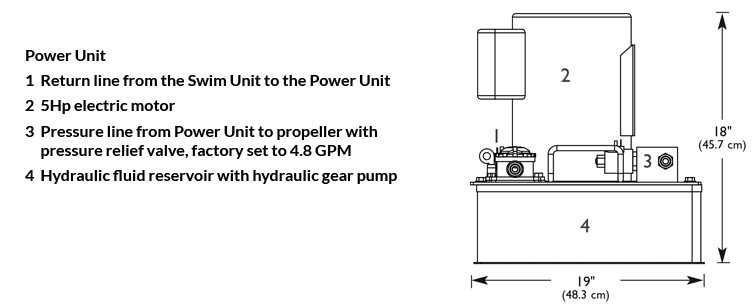
In addition to planning for the position of the swim unit you must also plan for the location of the hydraulic power unit. Typically this is placed next to your other pool equipment. It is important that the unit is not subjected to driving rain and it must always be placed on solid ground. The power unit is also air-cooled and must be sited with plenty of ventilation, ideally a minimum of 12” (30cm) air space must be left on all sides. In addition, although frequent access is not required it is important that the power unit is accessible once sited for the purposes of general maintenance.

The dimensions of the power unit are as follows.

Endless Pools Fastlane Positioning

Electrical requirements

It is important that the Fastlane installation complies with the National Electric Code Article 680 Swimming Pools and Similar Installations and any other applicable local codes and ordinances. The Fastlane is ETL listed, Ref.#2001770, and CE listed. A licensed electrician can help with this review and must perform all electrical work.

Below are some of the most important considerations.

Ground Fault Circuit Interrupters (GFCI)

All equipment provided by Endless Pools, Inc. and all associated pool equipment must be protected by GFCI.

These GFCI circuits must be tested monthly.

Power Unit Connections

The Fastlane requires a single 30-Amp, 220-Volt GFCI circuit to operate. An electrician must install a disconnect box within 6' of the Power Unit location.

Bonding

Both the Swim Unit and Power Unit have bonding lugs. Proper bonding with a #8 or larger solid copper wire is required.

In summary, why should you build your own endless pool?

Remember, a swimming pool doesn't have to take up a vast amount of space in your garden. If space is at a premium or you don't want to lose valuable playing space for the kids you can always build your own endless pool. A modest sized, inground swimming pool with an Endless Pools Fastlane will create the perfect swim in place pool without the need for as much space. Instead of having to make turns while you swim, you simply swim against the Fastlane's powerful swim current. Perfect!

Spring Is Coming: How To Get Ready By Shocking The Pool

All Swim 16 inch rubber bristle brushAfter a few months of hibernation over the winter, the arrival of spring means it’s time to think about getting your swimming pool ready for the new season – and hopefully lots of fun and relaxation over the summer!

Before starting, it’s a good idea to make sure you have everything you will need to open up the pool, including:

  • A good leaf net and extending handle
  • Waterline or Tile & Liner Cleaner
  • Winter debris cover cleaner
  • Pool brush
  • Garden hose
  • Protective equipment (chemical resistant gloves & safety goggles)
  • Chemicals to put in to the pool (shock chlorine, algaecide, pH adjusters)
  • Test strips

Once you’re fully stocked up, follow the below step by step guide to opening up your outdoor swimming pool:

  1. All Swim waterline cleaning productsRemove surface water and any debris from the winter cover before taking it off.  Then carefully clean the cover, dry it off (towels or a leaf blower work well here) and re-package it ready for storage.
  2. Using your extending handle and leaf net, remove as much debris from the pool as possible and clean any tide marks at the water line using All Swim Tile & Liner Cleaner or Waterline Cleaner. To view our complete range of waterline cleaning products click here.
  3. If you removed the pump last winter, reconnect it making sure all the electrical connections are free from dampness – if unsure call in an electrician to do this step.
  4. Open any valves beneath the water line which may have been closed or plugged.
  5. Check there are no obstructions to the drains, the outlets and the pump strainer basket.
  6. If necessary, top up the water level so that it can be drawn in through the skimmer / skimmers.
  7. Prime the pump, turn it on and check that the filter, skimmers and drains are all working. Don’t be too concerned if the water from the circulation is discoloured at first. If the water level was too high because of rain over the winter, pump to waste.
  8. Run the filter for several hours, vacuuming out any remaining debris.
  9. Backwash the filter and top up with fresh water.
  10. Prepare your heat retention cover ready for use, cleaning off any patches of algae or mould.
  11. Check the pH and adjust to 7.2 – 7.6. Use All Swim Pool Acid if you need to lower the pH or All Swim Pak 2 to raise it. To view our complete swimming pool water balance chemicals click here.
  12. Lo-Chlor Knock-out Algaecide, Jelly Clear Cubes and Jolly GelDose the pool water with All Swim Shock Chlorine following the instruction label on the container.  This will kill off any algae and harmful organisms that may be present. Allow the water to circulate to ensure thorough mixing and if required, add Lo Chlor Algae Knock Out to get rid of particularly stubborn patches of algae.
  13. The final step is to add an algaecide to prevent algae growth. Long life algaecides such as Kleen Pool or Lo Chlor Pool Algaecide can keep algae at bay for up to 6 months, or if you prefer to dose it regularly, All Swim Algicide is a weekly treatment. To view our complete range of pool algicides, clarifiers and cleaners click here.

Once the pool is clean and ready for the start of the season remember to bring or send in a sample of your swimming pool water in a 500ml empty still mineral water bottle with your pool details and we can test the sample FREE of charge for you using a photometer to analyse the current water balance and we will then give you a free report detailing any recommended remedial action required.

If you are unsure of any element of swimming pool chemicals or water treatment please do not hesitate to contact us for further help and advice by calling 029 2070 5059.

Looking After Your Swimming Pool

All Swim water balance chemicalsAs a new swimming pool owner you probably feel there is so much to learn and familiarise yourself with – this is true, but if you start out on the right foot, pool maintenance and water treatment will become easy to maintain in the long term.

The biggest learning curve with pool ownership tends to be the water chemistry, so we have put together a brief guide we hope you find helpful.

Guide to the chemicals in a new pool

A simple system to help pool owners learn about proper water balance is the Blue Horizons ‘BOAST’ system. This system will help you remember the key points in achieving safe, clear and clean water:

B  =  Balance your pool water for bather comfort and maximum chemical efficiency. This includes adjusting the pH level up or down as required, raising Total Alkalinity and Calcium Hardness when necessary. All the products you need to adjust your swimming pool water balance can be found here.

O = Oxidise to establish a sanitiser level then weekly to destroy waste compounds. Chlorine is the most common sanitiser used in swimming pools, which kills bacteria and keeps the water safe and clean. Shock Chlorine is used to raise the sanitiser level quickly (and to kill algae off if present). TIP: if the pool is heated, Quick Dissolve Shock does not need to be pre-dissolved, so will save you time and energy!

A = Algae prevention, stop algae establishing itself in your pool water. Using a long-life algaecide such as Kleen Pool or Lo Chlor Pool Algaecide will help keep the pool free from algae for up to 6 months. Or use All Swim Algicide for weekly dosing. To view our complete range of swimming pool algicides, clarifiers and cleaners click here.

All Swim water balance chemicals SSanitise, maintain a constant sanitiser level to prevent and kill bacteria. Stabilised chlorine (Cyanachlor) in the form of either granules to be pre-dissolved in water or tablets with a floating dispenser are used for regular dosing. To view our complete range of chlorine water treatment chemicals click here.

T  = Test your water frequently, you really don’t know what the levels are without testing! Test strips are extremely easy to use and provide an accurate reading of your water chemistry and there are also various test kits available to keep track of your water balance. To view our complete range of pool and hot tub water testing kits click here.

We also provide a FREE water sample testing service in our showroom, simply bring or send in a sample in a 500ml empty still mineral water bottle with your pool details and we’ll use a photometer to analyse the current water balance and we will then give you a free report detailing any recommended remedial action required.

If you are unsure of any element of swimming pool chemicals or water treatment please do not hesitate to contact us for further help and advice by calling 029 2070 5059.


What Size Of Hot Tubs Are Available?

Caldera Spas Aventine hot tubDo you love the idea of having a hot tub but wonder if there is one to fit your space? We get it, once you start looking around and visiting showrooms the sheer size of hot tubs in real life can be overwhelming, especially if you’re limited on space.

Hot tubs in all shapes and sizes

At All Swim we stock a large selection of Hot Tubs ranging from 2 to 8 seaters to suit a wide variety of customer needs and spaces.

Short on space? Our most compact 2 seater hot tub is the Caldera Spas Aventine which measures 1620 x 1620 mm and is specially designed to fit snugly into a corner. And the cleverly designed 3 person Kauai features the UltraMassage Lounger which delivers a powerful, adjustable full body massage alongside 2 seats facing each other.

Or maybe you’re looking for a larger-than-average hot tub – in which case the 8 person Cantabria by Caldera Spas offers the ultimate in customisable massage and comfort – complete with a state of the art design.

Hot tub circuit therapy, the Caldera Spas differenceWe have a range of all-seated hot tubs too that comfortably seat 7 people, ideal for large families or entertaining friends.

Find the right fit

A question we are often asked when customers visit our Cardiff showroom is "How big are the hot tubs you have?" Getting the measurement of hot tubs is naturally a factor in choosing the right one, so to make it a little easier we have compiled a chart showing the measurements and weights of every hot tub we stock along with useful information on everything you need to consider before buying a hot tub.

Did you know that we also offer a free site visit? This can be helpful for checking the access for delivery and offering advice regarding positioning and which model could best match your needs, and there is no obligation to purchase if you decide not to!

Whatever size and style of hot tub you have in mind, our aim is to help you find the perfect choice. For more information on any of our hot tubs by American manufacturers Caldera Spas, Fantasy Spas or DreamMaker, you can get in touch with us by calling 02920 705059 or via our online form.

Alternatively you can view our entire range of hot tubs online. 

Caldera Spas sizes


Utopia Series Dimensions
L x W x D
Empty
Weight kg
Filled
Weight kg*
Capacity
litres
Amps
required
Cantabria 2740 x 2310 x 970mm 595 3,560 2,325 40
Geneva 2260 x 2260 x 970mm 455 2,485 1,550 40
Niagara 2260 x 2260 x 970mm 450 2,535 1,525 40
Tahitian 2130 x 2130 x 910mm 410 2,315 1,425 40
Tahitian AMS 2130 x 2130 x 910mm 410 2,315 1,425 40
Florence 2130 x 2130 x 910mm 395 2,235 1,360 40
Provence 2130 x1980 x 890mm 395 1,715 1,005 40
Paradise Series Dimensions
L x W x D
Empty 
Weight kg
Filled
Weight kg*
Capacity 
litres
Amps 
required
Makena 2260 x 2260 x 910mm 465 2,445 1,500 40
Salina 2260 x 2260 x 910mm 455 2,615 1,600 40
Martinique 2260 x 1930 x 860mm 420 2,320 1,500 40
Kauai 2130 x 1650 x 750mm 335 1,450 875 16
Vacanza Series Dimensions
L x W x D
Empty 
Weight kg
Filled
Weight kg*
Capacity 
litres
Amps 
required
Palatino 2260 x 2260 x 980mm 415 2,420 1,525 20
Marino 2130 x 2130 x 910mm 380 2,235 1,375 16
Vanto 2130 x 2130 x 910mm 385 2,370 1,425 16
Capitolo 2080 x 2080 x 840mm 330 1,905 1,175 16
Celio 2130 x 1650 x 760mm 290 1,355 825 16
Aventine 1620 x 1620 x 740mm 225 960 575 20

* Filled weight includes the weight of the occupants assuming an average weight of 80kg each


Fantasy Spas sizes


Fantasy Spas Dimensions
L x W x D
Empty
Weight kg
Capacity
litres
Amps 
required
Drift 1730 x 1600 x 810mm 129 841 13 or 16
Embrace 1830 x 1830 x 790mm 137 776 13 or 16
Entice 2190 x 1960 x 840mm 172 890 13 or 16
Splendor 1980 (diameter) x 860mm 163 984 13 or 16
Aspire 1830 x 1190 x 710mm 113 435 13 or 16


DreamMaker Spas sizes


DreamMaker Spas Dimensions
L x W x D
Empty
Weight kg
Capacity
litres
Amps 
required
Fantasy 1980 x 1680 x 810mm 120 700 16
EZ Spa 1980 x 1730 x 810mm 129 795 16
EZ L Spa 1980 x 1730 x 810mm 147 795 16
Odyssey 2080 x 2080 x 810mm 154 1022 16
Big Ez 2080 x 2080 x 810mm 154 1022 16
Dream 600L* 2030 x 2030 x 910mm 179 1080 23
Cabana 1 pump* 2030 x 2030 x 860mm 190 1190 20
Cabana 2 pumps* 2030 x 2030 x 860mm 190 1190 25
Heatsavr Is Put To The Test

An outdoor swimming pool before using HeatsavrHeatsavr, the original liquid pool cover, was first introduced to the UK leisure industry almost 10 years ago. During this time, a number of commercial pool operators and domestic owners have adopted the technology and enjoyed considerable energy savings, as well as the benefit of a simple pool cover system that works 24 hours a day. However, for pool managers and council heads who are in control of expenditure where the pool itself has limited controls, using Heatsavr may feel like a leap of faith as the energy savings may not be easily extracted. Furthermore the product is odourless, tasteless and completely invisible, tempting pool managers to wonder if it is working at all. It is unsurprising that some pool managers seek credible analysis to prove that Heatsavr really can save energy. However carrying out product trials can be expensive and time consuming.

All Swim's supplier decided to approach EEVS, the UK’s leading provider of independent performance measurement and verification (M&V) services for energy, water and waste efficiency products and services, to carry out analysis on a client’s energy data. The objective was to determine if, through independent verification, Heatsavr could be proven to offer customers a level of energy saving worth investing in. Pool boiler readings were supplied to EEVS by our suppliers client, Hoburne Holiday Parks in Torbay. The readings related to weekly gas consumption for the pool for a 13 week period between April and July in 2010 and 1 year later, in 2011, when Heatsavr was in use. Taking into consideration the external air temperature during these 2 time periods, Heating Degree Days were used to determine a base temperature on which to compare Heatsavr’s ability.

An outdoor swimming pool after using Heatsavr liquid pool coverThe Hoburne site in question was a deck level pool that had VSDs linked to humidity. There were no changes to the fabric of the building during the 2 time periods so no known external factors affecting the results. EEVS was able to determine from the data provided that the site had benefitted from a reduction in gas usage during the 13-week period in 2011 of 56,509kwh. Using a commercial gas price of 2p per kwh, this equated to a financial saving of £1130, equivalent to an impressive 21.7% reduction in gas usage. On a cumulative basis the reduction in gas consumption would be equivalent to approximately £4500 per annum.

The Hoburne site could have enjoyed even greater savings by reducing the air heating system at night when the pool was closed. The report does not evaluate the associated savings on water consumption either as this data was not available for analysis.

Based on a saving of 56,509kwh, the Hoburne site also produced the equivalent of 10.5 tonnes less CO2 during this time period, or 42 tonnes on an annualised basis. Heatsavr works by slowing evaporation from the pool’s surface. The Heatsavr monolayer spreads across the water and traps energy and moisture within the pool. In an indoor pool, energy savings relate not only to pool water heating but also to the ability to turn down the dehumidification system due to the reduced evaporation.

Click here to view our Heatsavr productHeatsavr has to be added to the pool on a daily basis to maintain its effectiveness. This is because Heatsavr biodegrades – it has what is called a 2 day half life – which means that in 2 days 50% of it has biodegraded.

The EEVS report is available from our supplier to anyone who is genuinely interested in saving energy and CO2 output from within their pool. Our supplier chose to work with EEVS due to their credibility within the M&V sector. EEVS was the first UK adopter of the International Performance Measurement and Verification Protocol (IPMVP), the leading global standard. EEVS is also certified by BSI to ISO 9001:2008.

In providing customers with the independent analysis that they have been seeking, All Swim hopes to be able to deliver energy saving benefits and ultimately, peace of mind, to a greater number of commercial operators and domestic pool owners across the UK. Pool managers and pool owners alike should have confidence in the findings and recognise that whilst invisible, Heatsavr continues to work throughout the day and night, saving energy and enabling you to focus on other cost saving initiatives within their site.

For further information on EEVS and the services offered, please visit www.eevs.co.uk. If you are interested and would like to contact All Swim for advice on energy, water and CO2 savings with Heatsavr please call us on 029 2070 5059.

Instructions On How To Install A Swimming Pool Liner - A Step By Step Guide

Fitting your swimming pool liner underlay
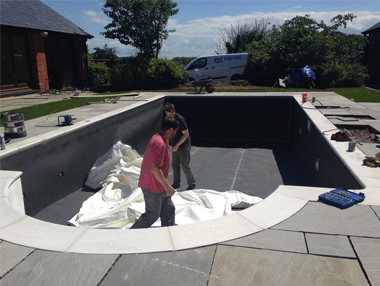
Whether you are replacing an existing pool liner or building a new liner swimming pool, once you’ve got your new liner it’s important to follow the right steps to install it.

Pre installation notes:

  • Fitting the coping stones before the liner is recommended to prevent damaging the liner once installed (with the linerlock fitted before the coping stones)
  • Ensure the pool is spotlessly clean before you begin and that all gaskets on the pool fittings are in position
  • A minimum outside air temperature of 10°C is required to install a liner (to ensure the liner material is pliable to stretch it into position for a wrinkle-free fit). Temperatures above 24°C should also be avoided as the material may become overly-flexible and risk stretching out of shape under its own weight.

Underlay

Fitting your swimming pool linerIf you have chosen to fit a foam or felt underlay, spot the adhesive on the pool walls then fit the underlay in place. No adhesive is needed on the pool floor but cross weave tape is used over the joints.

Step by step guide: Liner instructions, how to put it in:

  1. Carefully unpack the liner whilst in the pool itself and check for the arrow showing the deep end of the pool. Unfold the liner carefully and locate the 4 corners beginning with the shallow end and roll out towards the deep end, unfolding the walls accordingly. Consult the full liner installation instructions before proceeding
  2. The beading on the liner fits into the linerlock that is found at the top of the wall (held in position because of its special shape)
  3. If you have or decide to hire a wet & dry vacuum cleaner with hose attachment, it will make fitting the pool liner much easier; fit the liner in the linerlock all around the pool except for a small section about 12 inches away from the deep end corner. Starting to fill your new swimming pool liner with water
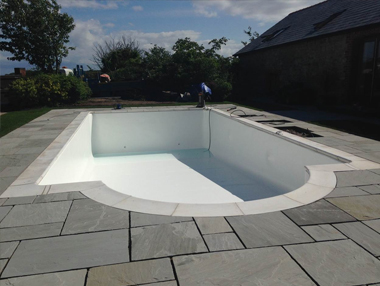
Push the suction hose down between the wall and the liner until it is approximately 1 inch (25mm) from the bottom of the wall. Make sure, if the pipework is not completed, that the ends of the pipe runs are sealed off to prevent loss of vacuum. Seal around the vacuum hose with a wet cloth or tape and the liner will be sucked to the pool walls and floor once the vacuum is switched on. Check the liner is in the correct position and if not, turn the vacuum off, adjust then restart it.
  4. Start filling the pool with water once the liner is correctly positioned, leaving the vacuum running until the water covers the shallow end of the pool by at least 6 inches (150mm). The vacuum can then be removed and the remaining liner bead fitted to the linerlock.
  5. Check the positioning of the liner again at this stage. The liner should be bedded down with equal tightness on all 4 sides of the pool.

Pools with a deep end / main drain fitted

  1. Gradually filling your new swimming pool liner cutting in as the water line reaches fittings
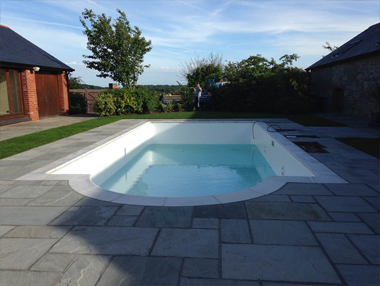
Once steps 1-5 above are thoroughly checked, fill with water until there is 6-8 inches (150mm – 200mm) in the hopper – it’s recommended you anchor the 2 shallow end corners with sandbags at this stage if you are not using a vacuum.
  2. When the water level in the deep end reaches 1 foot (300mm) the main drain can be cut in.
  3. If the liner is away from the shallow end wall (a small gap at the base of the wall is acceptable; this will be pushed in by the weight of water as the pool fills), free it from the linerlock, get behind the liner and gently pull the liner to the shallow end. The liner can stretch considerably, particularly in hot weather. After gently and firmly stretching the liner, weighted sandbags should again be put in each corner to anchor them as filling with water continues (removing them when there is 6 inches (150mm) of water covering the shallow end).
  4. As the water reaches a level just below each of the pool wall fittings/lights etc; stop and cut them in before continuing with the filling process until the water level reaches the middle of the skimmer mouth.
  5. At first, the liner will probably have several packaging folds and wrinkles. These will disappear on their own if installation is done on a hot day but may need some assistance on colder days. Wait until the wrinkle is covered with 3 inches (75mm) of water then gently pull the material away from the wrinkle – once released the weight of the water will keep the liner in its wrinkle-free position.
  6. As the water rises, the wrinkle release process will need to be repeated as necessary in stages, but taking care and showing patience will result in a perfect liner fit. Note: if the water depth gets to 8 inches (200mm) or more over a fold or wrinkle, there will be too much weight on the liner to straighten it out and the wrinkle will be permanent.

Fitting the liner with a Roman End, Square or Corner Step unit

Step Units:

Enjoying your new DIY liner pool kit
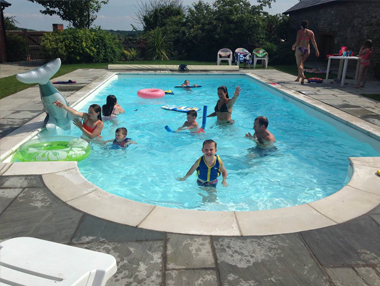
There are different types of step units but all will be supplied with a gasket and faceplate. Remove the screws around the faceplate of the step unit and take off the faceplate leaving the gasket attached to the step unit.

For Roman End or Square steps, a plank of timber or scaffolding board is placed temporarily across the top of the step unit and the liner is fitted as described above.

To prevent the liner sagging at the step unit, it is fixed to the plank with drawing pins. As the level of water reaches the first step, the liner should be firmly located around the pool and the faceplate is then fitted. Screws are inserted through the faceplate, gasket and step unit and progressively tightened in sequence. Firmly secured, the liner can now be cut away from the inside of the faceplate and removed.

Applying tape to the back of the liner and the step unit to seal the gap will improve the performance of the vacuum if used.

We hope you have found our Liner Installation Guide helpful and if you could use any further advice or support, please contact us on 02920 705059 or email sales@allswimltd.com.

What Exactly Are The Aquafinesse Ingredients?

If you’ve been looking for a chlorine free hot tub treatment, you may already be familiar with the name Aquafinesse and want to know more about its’ benefits. The Aquafinesse ingredients consist of a complex mixture of Inorganic Salts, Coagulants and some other environmentally friendly ingredients that have the unique ability to kill bacteria and remove the slimy Biofilm that attaches to hot tub surfaces (where 99% of the total bacteria in the spa live!) and to prevent it reforming.

Why use Aquafinesse?

Aquafinesse Spa Kit, the alternative to chlorine and bromine sanitisers for your hot tubHot tub owners who are sensitive to chlorine need a safe, gentle and effective sanitiser that won’t irritate their skin. Aquafinesse is a weekly hot tub water treatment that is safe and certainly amongst the best hot tub chemicals for sensitive skin.

The unique and complex combination of Aquafinesse ingredients work to destroy and remove the stubborn bacteria that attaches itself under a layer of ‘slime’ (known as Biofilm) on hot tub surfaces. Biofilm actually protects the bacteria from being destroyed by the use of traditional sanitisers alone, making it near impossible to get rid of it. Aquafinesse not only removes this layer of Biofilm and the bacteria lurking beneath, it also prevents the bacteria from growing and taking hold on the surface again. The need for supplementary chlorine is dramatically reduced as a result of Aquafinesse’s actions; Aquafinesse: 1 – Biofilm: 0.

Another bonus benefit of using Aquafinesse is the reduction of any calcium deposits and build-up that can be damaging to your hot tub equipment.

What’s involved in the Aquafinesse treatment?

Before switching to Aquafinesse, a deep clean is needed using the Aquafinesse Spa Clean to remove all of the existing biofilm and bacteria. Dissolve the Spa Clean in warm water, remove the filter cartridge then put all jets on then add to the spa water. A traditional shock dose is done at the same time to kill of the bacteria once released by the action of the Aquafinesse Spa Clean. The tub water is then drained and re-filled with fresh water.

Aquafinesse Spa Clean, for deep cleaning your hot tubThe Aquafinesse Kit contains 2 bottles of Aquafinesse liquid with a dispenser and measuring cup, for easy weekly dosing plus 18 Trichlor Chlorine Tablets and the Aquafinesse Hot Tub Water Care Kit typically lasts 3 – 6 months depending on the size of your hot tub.

Regular cleaning of the hot tub filter cartridge using Aquafinesse Filter Cleaning Tablets will also ensure your filtration is running at its’ best.

The Aquafinesse Effect

Many users of Aquafinesse report seeing a marked improvement in the spa water quality with silky, clear water that also leaves skin feeling great – and less time spent maintaining the water balance due to the fuss-free liquid application!

If you like the sound of having an easy, safe and environmentally friendly hot tub water care system, try switching to Aquafinesse and see the results for yourself.

Fit@Home With Endless Pools – Your Workout Programme At Your Fingertips!

Endless Pools Fit@Home App
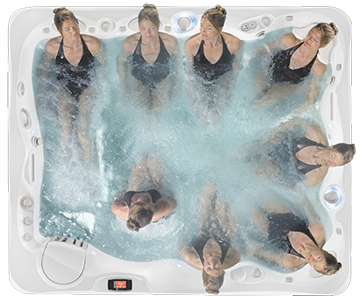
The Endless Pools Fastlane is a counter current swimming machine that enables the user to swim for as long as desired without turning, and is available either as a standalone swimming machine for an existing pool or as part of the Endless Pools swim spa range. If you’ve ever used a Fastlane, you’ll know all about the benefits of being able to swim-in-place without turning from a workout perspective.

The latest innovation from Endless Pools, the Fit@Home Wifi Kit and Mobile App, has raised the bar even higher by enabling you to tailor and control your workout with your fingertips! The Wifi Kit consists of a Wifi board and antenna that hook directly to the HPU, producing a Wifi signal that is compatible with most mobile devices. After then downloading the Fit@Home App (free on any iOS or Android OS supported device) you can get to work creating your customised workouts and saving them- ready to be accessed in a flash when it’s time for your workout.

Become your own personal trainer

Choose and set your workout time, pace and distance, save and press the start button on your mobile or tablet when you’re ready for your tailor made workout – leaving you to focus on getting the most out of your session without interruption.

Using an Endless Pools Fitness Systems complete with a Fastlane and Underwater Treadmill allows for even more variety, think:

  • 10 x minute swim @ pace
  • 5 x minute run @ pace
  • 10 x minute swim @ pace

Or if you just want a quick fuss-free workout, the Manual Control option is ideal for a quick swim.

If you have an Endless Pools Fastlane* in your pool or your Endless Pools Fitness System* and want to enhance your workout experience, the Fit@Home App offers a convenient way of planning workouts in advance to give you variety and push you harder during the session – your very own Personal Trainer at the touch of a button.

For more information on the Fit@Home App or Endless Pools contact us on 02920 705059.

*Please note the Fit@Home Wifi Kit is only compatible with EP3 power units.

Building Your Own Swimming Pool With A DIY Pool Kit

Excavating the ground in preparation for building a DIY pool
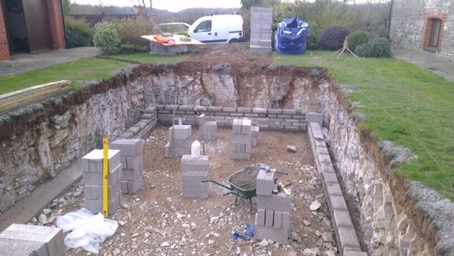
Has the glorious summer we were lucky enough to enjoy this year left you dreaming of improving your outdoor space? Believe it or not, now is the ideal time to put plans into place for having your own in-ground Swimming Pool or installed by Summer 2019.

What are the options?

The first thing to decide is whether a Concrete Tiled or Vinyl Liner DIY pool suits you best. A liner pool is the cheapest option and can be built to a variety of pool sizes. Standard DIY liner kits include a 30 Thou 0.75mm thick ‘bag type’ vinyl liner, with the other option being a 1.5mm thick specialist ‘On Site’ lining that is also available.

Liner pool installations also have a quicker start to finish time, as they don’t have the same curing and drying time requirements as a Concrete pool. Liners usually have a lifespan of 10-15 years (handy tip: the better you look after the pool water chemistry, the longer your liner will last!) which gives you the chance to change the appearance at the time if you feel like a change.

Liner pools consist of a concrete strip foundation with concrete block walls built up from the floor. The pool walls are rendered and the floor screeded, to provide a completely smooth surface for the liner. The vinyl liner is what acts as the waterproof membrane of a liner pool.

Laying the blockwork for the walls of a DIY pool
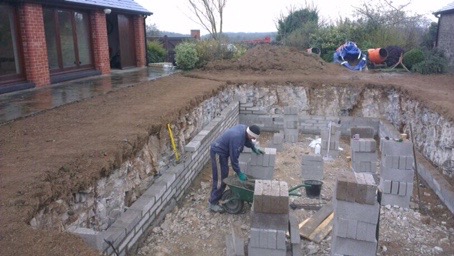
Concrete pools can be built to any size and shape and consist of a reinforced concrete slab base with starter bars coming out of the floor which sit within the cavity of the concrete block pool walls. Concrete pools require 2 coats of waterproof render over the walls and floor, so that the pool shell itself is fully watertight. The purpose of mosaic tiles is simply aesthetic, as they are not necessary as part of the waterproofing.

It’s easier than you might imagine…

Planning permission is not usually required by the majority of UK local authorities for self-build pools in domestic back gardens (unless installing a pool building or an enclosure is also planned), but it is recommended you check with your local authority in advance. And certainly, the foundation work and rendering of the pool walls is typically within the capabilities of a standard builder.

Step by Step, these are the stages involved in DIY Swimming Pool construction:

  1. Preparing the blockwork wall for rendering your in-ground pool
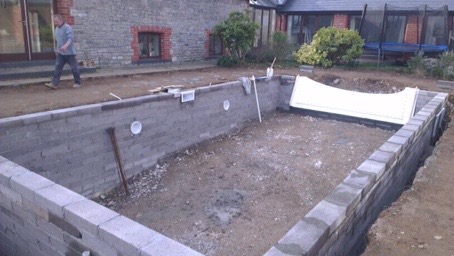
Marking out the pool. Once the pool size has been decided, mark the area out to the given dimensions.
  2. Excavation. Time to dig - A mechanical excavator is by far the quickest and easiest method of carrying out this part of the project!
  3. Foundations & Rendering
    Liner Pools: Lay a concrete strip around the perimeter of the pool, 9 x courses of concrete blocks on flat for the walls (with no wall cavity or reinforced bars required for the floor).
    One coat of render is applied to the walls and screed to the floor then a concrete ring beam fitted behind the top of the pool wall which is then backfilled. The purpose of the render is to provide a completely smooth surface so it’s important to ensure no stones etc are present in the render as this will be visible once the liner is fitted.
    Concrete pools: A steel mesh reinforced concrete slab forms the foundation with starter bars for the walls. 2 courses of concrete blocks on flat make up the walls with a cavity for the steel reinforcement for stability.
    Concrete pools are made watertight by 2 x coats of sand and cement render mixed with a special chemical that provides the waterproofing element.
  4. Installing the underlay prior to fitting the DIY pool kit liner
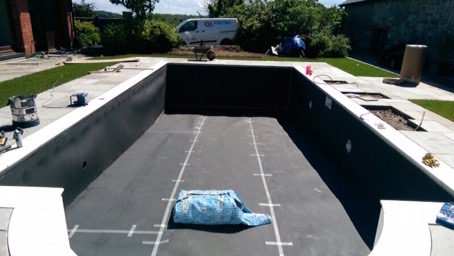
Finishing. A white plastic called ‘Linerlock’ is fitted around the perimeter of a liner pool which holds the liner in place. There is a wide variety of liner patterns and styles to choose from which have a very realistic appearance to actual mosaic tiles. Concrete pools can either be painted with specialist pool paint or tiled with mosaic tiles.
    Coping stones for the pool surround are laid before the liner or the mosaic tiles are fitted with the final stage being the installation of your pool equipment (pump, heater and filter). This equipment is housed in a Plant Room, preferably as close to the pool as possible.

Complete guides to the construction of both Liner and Concrete DIY Pools are available here:

View the All Swim guide to liner DIY pool kits

View the All Swim guide to concrete pool kits

A pool adds value to your wellbeing and your home

The finished DIY liner swimming pool, ready to enjoy!
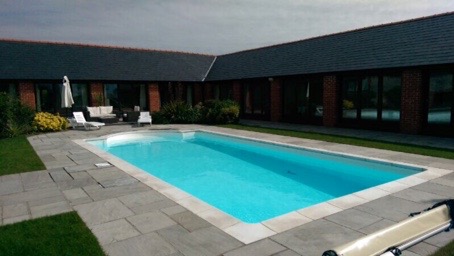
Once considered a luxury purchase of the wealthy, DIY swimming pool kits have made owning and building a pool more accessible and affordable than ever.

Adding a swimming pool to your garden is a great way of ensuring spending more quality time with your family and friends – whether it’s pool parties for the kids and their friends or enjoying a ‘staycation’ at home. No more expensive trips to the local swimming pool when you fancy a swim- simply grab your towel, remove the pool cover and you’re all set!

Why not build your own Endless pool?

Remember, a swimming pool doesn't have to take up a vast amount of space in your garden. If space is at a premium or you don't want to lose valuable playing space for the kids you can always build your own endless pool. A modest sized, inground swimming pool with an Endless Pools Fastlane will create the perfect swim in place pool without the need for as much space. Instead of having to make turns while you swim, you simply swim against the Fastlane's powerful swim current. Perfect! 

If you’re interested in finding out more, we offer expert advice and free, no obligation site visits across the UK. Please get in touch with us on 02920 705059 or email sales@allswimltd.com and discover how we can help your project turn into reality.

I Need A Replacement Hot Tub Filter Cartridge, What Do I Do?

Finding replacement hot tub filter cartridges can sometimes be a challenge, especially if you’re unfamiliar with the make and model of the spa or need a filter for an older model. Don’t worry though, we stock a vast range of popular filter cartridges at our hot tub showroom here in Cardiff, if we don’t have your particular hot tub filter we can source a vast range of other makes and models from our trusted network of suppliers.

Does your filter have a manufacturers code?

Perfect! This is usually the easiest way to identify the make and model of filter cartridge you require. Look for a manufacturers code on one of the ends of the cartridge and this will help us source a replacement item for you relatively quickly.

I don’t have a code, but I have my old filter cartridge.

If you can’t find a manufacturer’s code on your hot tub filter we can still source a replacement for you based on a few simple measurements of your old filter. Firstly measure the outside diameter (OD) of the hot tub filter cartridge and the inside diameter (ID) of the hole in the middle of the cartridge.

Next, measure the length from the outside of the cartridge (not including any raised steps, handles or threads).

Measuring the OD and ID of your hot tub filter Measuring the length of your hot tub filter


Lastly, if your hot tub filter cartridge doesn’t have a hole at each end, just let us know what type of end caps it has. Other types of tops will either be a handle or closed (flat). For the bottom, your filter may have a slip fit collar, coarse thread (SAE) or fine thread (MPT) collar.

Types of hot tub cartridge topsThreaded and non threaded hot tub cartridges

Ideally, to help us match your hot tub filter cartridge, a few photographs always helps us to identify the correct replacement for you. Or, if you are planning on visiting our hot tub showroom in Cardiff, bring your old filter with you and one of our trained sales staff will help identify the correct cartridge for you.

I don’t have a code or an old filter cartridge. What now?

Without an old filter cartridge or part code the simplest way of sourcing a replacement is by providing us with the make, model and year of manufacturer of your hot tub.

Remember, we are able to source a huge range of hot tub filters and our website has a small selection of the cartridges we stock. If you need any help or advice please call one of our friendly sales staff to discuss your specific needs on 029 2070 5059.

2024 All Swim Catalogue
A.J & J.L Veysey | Company registration no: 1061642 | VAT no: GB133 4078 90
All Swim Ltd, Units 3-5 Link Trade Park, Penarth Road, Cardiff CF11 8TQ

Modal